ICT Breaker Block: How to Trade This Reversal Pattern
How an ICT breaker block forms from a failed order block, how it differs from a mitigation block, and how to plan entries, stops and targets.
An ICT breaker block is an order block that failed: price swept liquidity beyond a swing, then broke straight through the order block that should have held, and that broken zone now acts as support or resistance from the other side. Traders use the breaker as a retracement entry after a reversal has already shown its hand. This guide from the LSG Club trading journal team walks through how a breaker forms, how it differs from an order block and a mitigation block, and how to plan entries, stops and targets around it.
What an ICT breaker block is
Start with the order block. A bearish order block is the last up-close candle before a strong move down; a bullish order block is the last down-close candle before a strong move up. The order block trading guide covers how to qualify them. As long as price respects an order block, it is an order block.
When price later closes through that order block with displacement, after first sweeping liquidity on the other side, the zone has failed. In ICT’s reading, the traders positioned from it are now trapped, and the zone flips its role. A failed bearish order block becomes a bullish breaker that should support price on a retracement. A failed bullish order block becomes a bearish breaker that should cap price.
How a breaker block forms
The breaker is defined by a sequence, not by a single candle. If one step is missing, you are looking at something else.
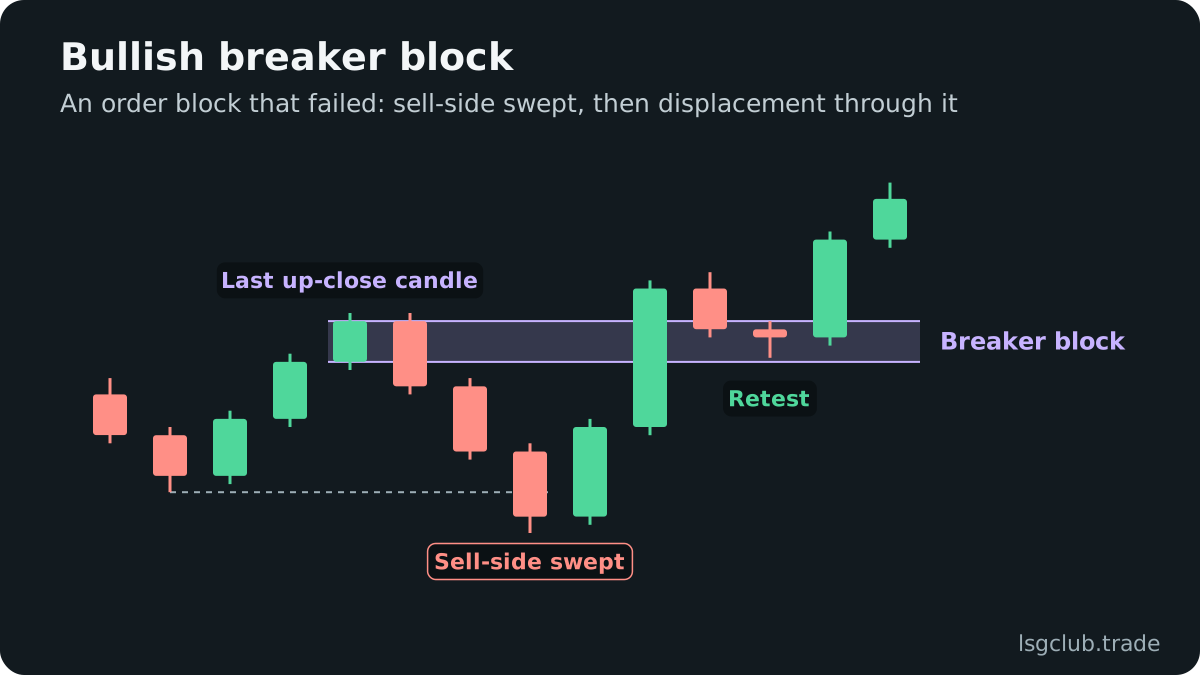
Bullish breaker block
- Price makes a swing low, rallies to a swing high, then turns down. The last up-close candle before that turn is a bearish order block.
- The decline continues below the earlier swing low, sweeping the sell-side liquidity resting there.
- Price reverses with displacement and closes above the swing high, a market structure shift to the upside.
- The bearish order block at that swing high has now been traded through. It is the bullish breaker.
- When price retraces back down into the breaker, buyers look for a long entry, with the swept low as the logical invalidation.
Bearish breaker block
The mirror image. Price makes a swing high, drops to a swing low and rallies again. The last down-close candle before that rally is a bullish order block. The rally runs above the earlier high, taking buy-side liquidity, then price reverses with displacement and closes below the swing low. The bullish order block at that low has failed and becomes the bearish breaker. On the retracement back up into it, sellers look for a short entry with the swept high as invalidation.
The two non-negotiable parts are the sweep of a prior extreme and the displacement break of structure. The liquidity sweep explainer and the market structure shift guide describe each of them on its own.
Breaker block vs order block vs mitigation block
- Order block — the last opposite-colored candle before a displacement move; it is traded as long as price respects it.
- Breaker block — an order block that failed after a liquidity sweep; the second leg made a new extreme (higher high or lower low) before structure broke.
- Mitigation block — an order block that failed without a sweep; the second leg made a lower high or a higher low instead of a new extreme, then structure broke.
The distinction matters because the sweep is the reason behind the reversal. A breaker shows that liquidity was taken before price turned; a mitigation block shows only that the trend ran out of strength. Many traders rank the breaker higher for that reason, but both belong to the family of ICT PD arrays and both should be judged in context rather than in isolation.
How to trade an ICT breaker block
A breaker is a retracement setup. The reversal has already happened; you are waiting for price to come back to the zone where trapped traders are trying to get out at break-even.
- Confirm the higher-timeframe bias and the draw on liquidity. A bullish breaker is worth more when H4 and D1 point higher and there is obvious buy-side liquidity above.
- Identify the full sequence on your execution timeframe: order block, sweep, displacement through structure.
- Mark the breaker using the candle bodies of the failed order block; many traders also mark its 50% level, the mean threshold.
- Check the location. A bullish breaker should sit in the discount half of the new leg, a bearish one in the premium half, which the premium and discount guide explains.
- Place a limit order at the top edge of a bullish breaker (bottom edge of a bearish one) or at its midpoint, according to your written rules.
- Set the stop and target before the order goes live, then leave it alone.
Stop placement and targets
Where the stop goes
The conservative stop sits beyond the swept extreme, below the low that took sell-side liquidity for a bullish breaker or above the high that took buy-side liquidity for a bearish one. If price trades back through it, the whole sequence is invalid. A tighter variant places the stop just beyond the far edge of the breaker; it improves the reward to risk but gets hit more often, so test it in your journal before relying on it.
Where to take profit
Targets come from liquidity, not from a fixed multiple. The first target is often the high or low of the displacement leg, the final one the next external pool, such as the previous day’s high or an old weekly extreme in the direction of the bias. Partial profits at the first target and a stop moved to entry after a fresh break of structure is a common management plan, but measure it rather than assume it helps.
Worked example: a bearish breaker on GBPUSD
Example for illustration only. On H4, GBPUSD is trading in premium and the daily bias is bearish. During the London Kill Zone (02:00–05:00 New York time) the M15 chart shows a swing high, a drop to a swing low and a rally from that low. The last down-close candle before the rally is a bullish order block.
The rally takes out the earlier swing high and the buy-side liquidity above it, then fails. Three strong bearish candles close below the swing low, leaving a fair value gap. The bullish order block at the low has been broken through: it is now a bearish breaker.
An hour later price retraces up into the breaker, which overlaps the fair value gap. The trader’s sell limit at the lower edge fills, the stop sits above the swept high and the target is the Asian session low below. Whether this trade wins or loses, the journal entry records the same facts: the sweep, the break, the overlap with the gap and how deep price traded into the breaker before turning.
Common breaker block mistakes
- Calling any broken order block a breaker — without a sweep of the prior extreme it is a mitigation block or simply a failed zone.
- Ignoring displacement — a slow grind through the order block does not show the same intent as an impulsive break.
- Trading against the higher timeframe — a bearish breaker in a strong daily uptrend is often only a pause.
- Using stale breakers — a zone that price has already revisited several times has usually done its job.
- Chasing — entering at market far from the zone because the retracement did not come destroys the reward to risk the setup offers.
Journaling breaker block trades
Tag breaker trades separately from order block and mitigation block trades, and add the context: which liquidity was swept, the timeframe, whether the breaker overlapped a fair value gap, and the session. Review the tags at the end of each week. The useful question is not whether breakers work in general but whether your version of the breaker, on your instruments and in your sessions, has a positive expectancy after costs. Trading carries risk, and only your own records can answer that.
FAQ
What is the difference between a breaker block and an order block?
An order block is a zone that has held so far. A breaker block is an order block that failed: price swept liquidity, broke through the zone with displacement, and the zone now works from the other side. You trade an order block in its original direction and a breaker in the opposite one.
Is a breaker block bullish or bearish?
Either. A failed bearish order block after a sweep of a low and a break above structure is a bullish breaker. A failed bullish order block after a sweep of a high and a break below structure is a bearish breaker.
What is the difference between a breaker and a mitigation block?
Both are failed order blocks. A breaker forms after price makes a new extreme and sweeps liquidity before reversing; a mitigation block forms when price fails to make that new extreme, printing a lower high or a higher low instead.
Which timeframe is best for breaker blocks?
Breakers appear on every timeframe. Intraday traders usually trade them on M5 to M15 with bias from H4 or D1, while swing traders use H1 to H4 breakers with bias from the daily and weekly charts.